
An article by Lead Integration Developer, Daniel Copping
In this article, I’ll describe how you can use the Optimizely Data Platform (ODP) to effectively track anonymous user interactions between different sessions and devices. The key emphasis here is on anonymous users. While ODP makes it easy to stitch your customer records using their email address, if you don’t know any personal identifiable information (PII) about your visitors (or don’t want to know), there are a few challenges to overcome.
I’ll demonstrate how you can achieve this by linking customers back to your site from external systems, using the example of personalised emails in Microsoft Dynamics 365.
Tracking by default
When a visitor arrives on your Optimizely site, a ‘Visitor Unique Identifier’ (VUID) is created and passed to ODP during the ‘Page View’ event. The VUID is also saved to a cookie so that any subsequent event will pass the same value. By this mechanism, all interactions can be attributed to the same customer record in ODP.
If the same person visits the site on a different device (or clears their cookies), they will be assigned a new VUID and a new customer record will be created in ODP with no link between them.
The problem here is that we are building-up more records of our visitors than we really have and these records don’t give us a complete view of a visitor’s interactions. This skews the data when generating reports and detracts from our ability to segment our user base and deliver personalised experiences.
Tracking known visitors by their email address
If we were not concerned with anonymous users, ODP would handle this ‘out-of-the-box’. Usually, it addresses the problem of disparate customer records by way of a special identifier, the email address. If two records share the same email, ODP can say with a high degree of confidence that they refer to the same person.
If your site has logins, you have an effective means to capture a visitor’s email and pass this along to ODP in addition to the VUID. When ODP captures this event, it will reconcile these two identifiers under the same customer record. Then, if the same user logs in on a different device, again passing the email and VUID, the two customer records are ‘stitched’ together under a single record.
Tracking anonymous visitors — why?
So if ODP has this solved for known visitors, why might you decide to track visitors anonymously? This decision is often rooted in a commitment to user privacy and regulatory compliance. By anonymizing data collection, you demonstrate respect for user confidentiality while navigating complex privacy regulations.
Another good reason is that you simply have no choice. If your site does not have logins you won’t have an effective means to capture a user’s email address.
Tracking anonymous visitors — how?
Without logins and emails, how can ODP stitch together your customer records?
ODP addresses this by way of ‘custom identifiers’. As an admin of ODP, you can create an identifier field that behaves much the same as the email address, i.e. any two records that share your custom identifier will be stitched together.
If you have an external system that links back to your site, perhaps an e-commerce platform, a CRM, an email marketing platform, or possibly a mobile app, you will likely have some sort of identifier for your users (either known or anonymous).
Whenever you share links with your users that direct to your site, possibly by campaign emails, push notifications or SMS, you can pass this identifier as a query parameter on the link URL. Then your web application can read this value, and set it as the user’s custom identifier in ODP. If the visitor opens any of these links on any two devices, their customer records created against each device will be stitched together.
Transparency and Consent
Before delving into the mechanics, I should mention that any type of user tracking should be conducted openly. If you are tracking your user data to ODP and stitching their records across session and devices, you should consider mentioning this in your privacy policy or cookie consent banner. This may impact your compliance with laws and regulations in your jurisdiction, namely GDPR in EU and CCPA in California.
How to
1) Create the Identifier in ODP
The first step is to create a new ‘Identifier’ in ODP. Do this by navigating to ‘Settings’, then ‘Objects & Fields’, click the arrow next to ‘Create New Field’ and then select ‘Identifier’ from the drop-down.
Note, if you don’t have administrative privileges to the ODP account, you will need to ask Optimizely support to set this up for you.

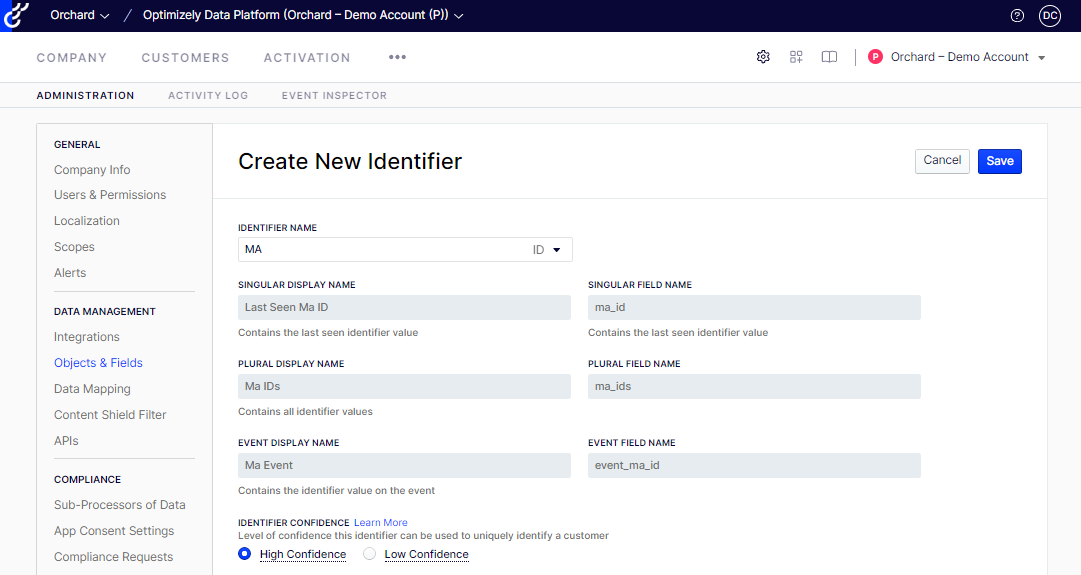
Creating new identifier field
Next, select the type of identifier (ID, key, hash etc) and give it a name. In this example (see image below), I have used the name ‘MA’ (Marketing Automation) and selected ‘ID’. ODP has auto-populated the rest of the fields, note the value for ‘Singular Field Name’ has been set to ‘ma_id’.
WARN: Do not use the word ‘ID’ in the Identifier Name. For example, if you select a type ‘ID’ and call your identifier, ‘MA ID’, ODP will append ‘ID’ to your auto-generated fields; your ID would become ‘ma_id_id’.
Finally, set the ‘Identifier Confidence’ to High. This means you have a high degree of confidence that the identifier refers to a single visitor. These types of identifiers merge events and profiles during the identity resolution process in ODP. It is up to you to ensure that the identifer you select from your external system is unique for the visitor.
For more information on Identifier Confidence, Optimizely has a great support article here
Setting the identifier values
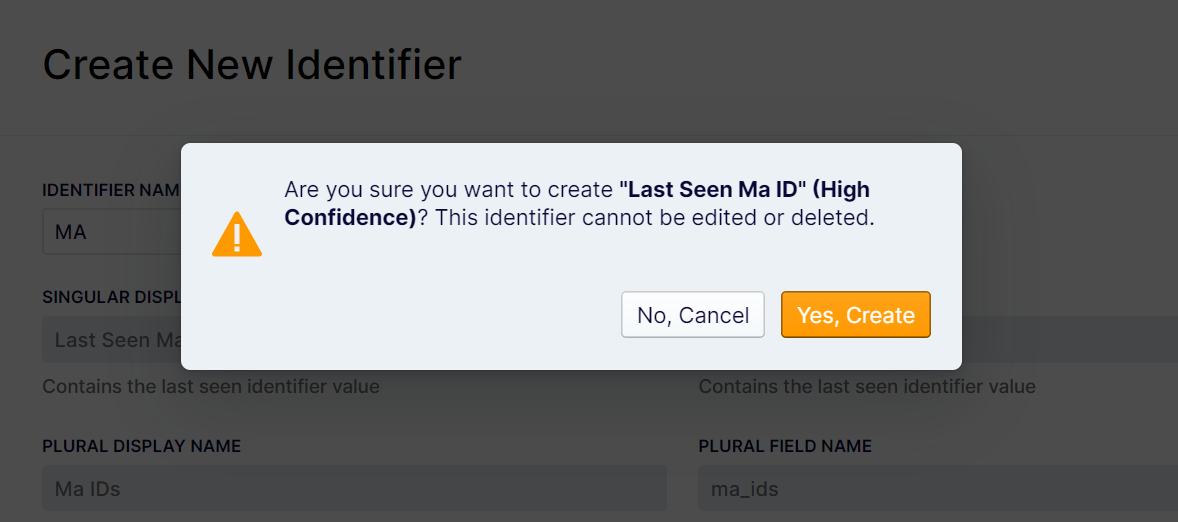
When you are happy with the fields you have set for the identifier, select ‘Save’. You will then be met with a warning stating that this change cannot be undone. This is true. The only way to reverse a mistake here is for Optimizely to completely reset the instance, losing any and all data and configuration. Be careful.
Once you have saved your identifier you should see it listed under ‘Objects & Fields’.
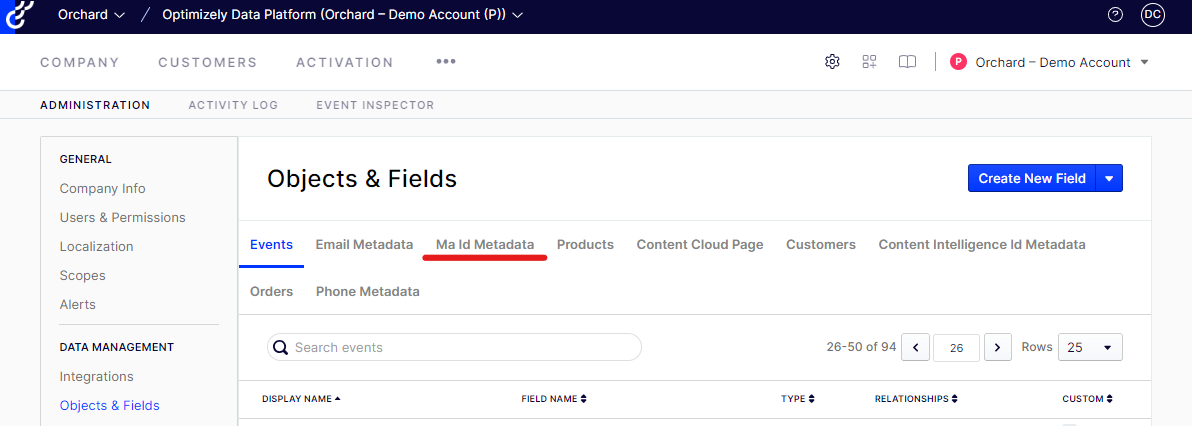
Marketing Automation Id has now been added
2) Pass an External Identifier
The next step is to pass a unique identifier from your external system on any personalised links that direct back to your website.
Let’s take the example of passing a custom identifier in personalised emails from Microsoft Dynamics 365.
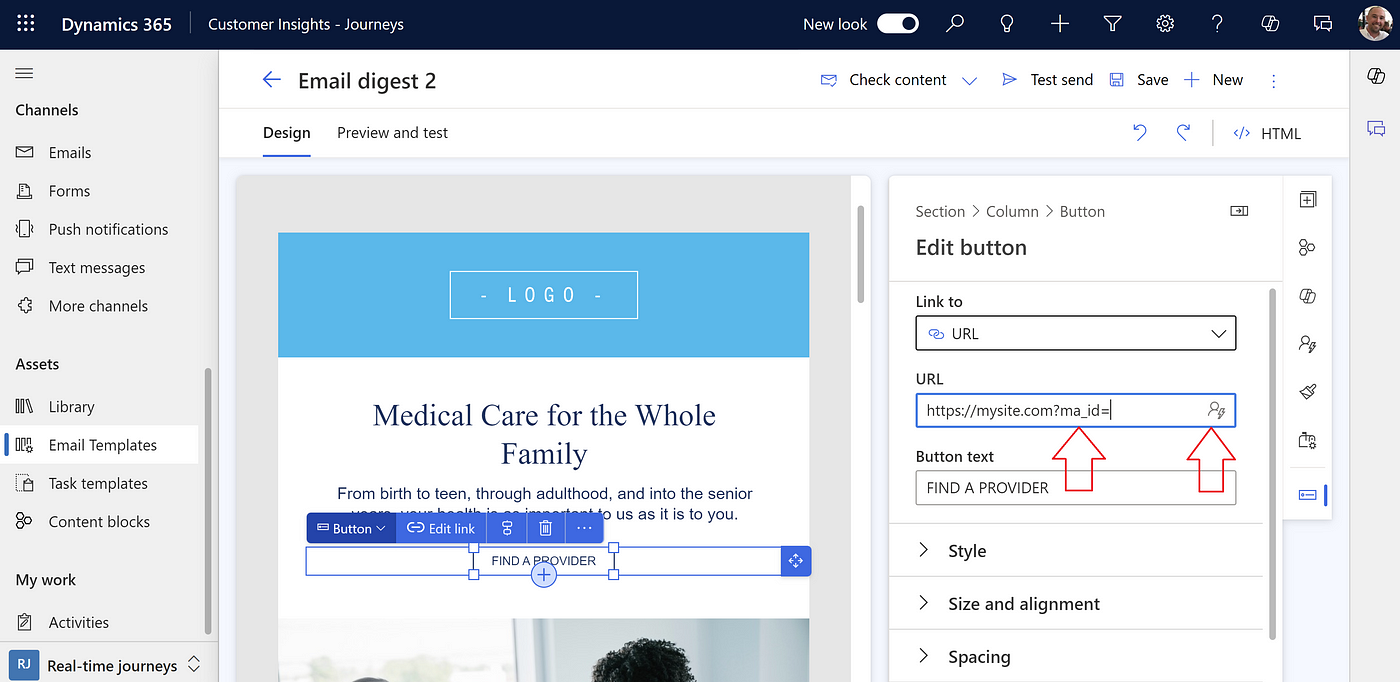
2.1) Setup the Links
In Dynamics’ email template editor, update any links that point back to your site. Add a query parameter to each of the links to represent your new identifier, e.g. ‘?ma_id=’.
Note, for simplicity, I have chosen a query string key that matches the name of our custom identifier in ODP (but it can be anything).
Next, press the ‘personalise’ button.
Setting a query parameter to hold your identifier
In the following dialog, you can select the personalised field you mean to use as your identifier. This can be any value that uniquely identifies the user, ideally not something that represents personal identifiable information (PII) such as their username or email. Here I am selecting the Account ID.
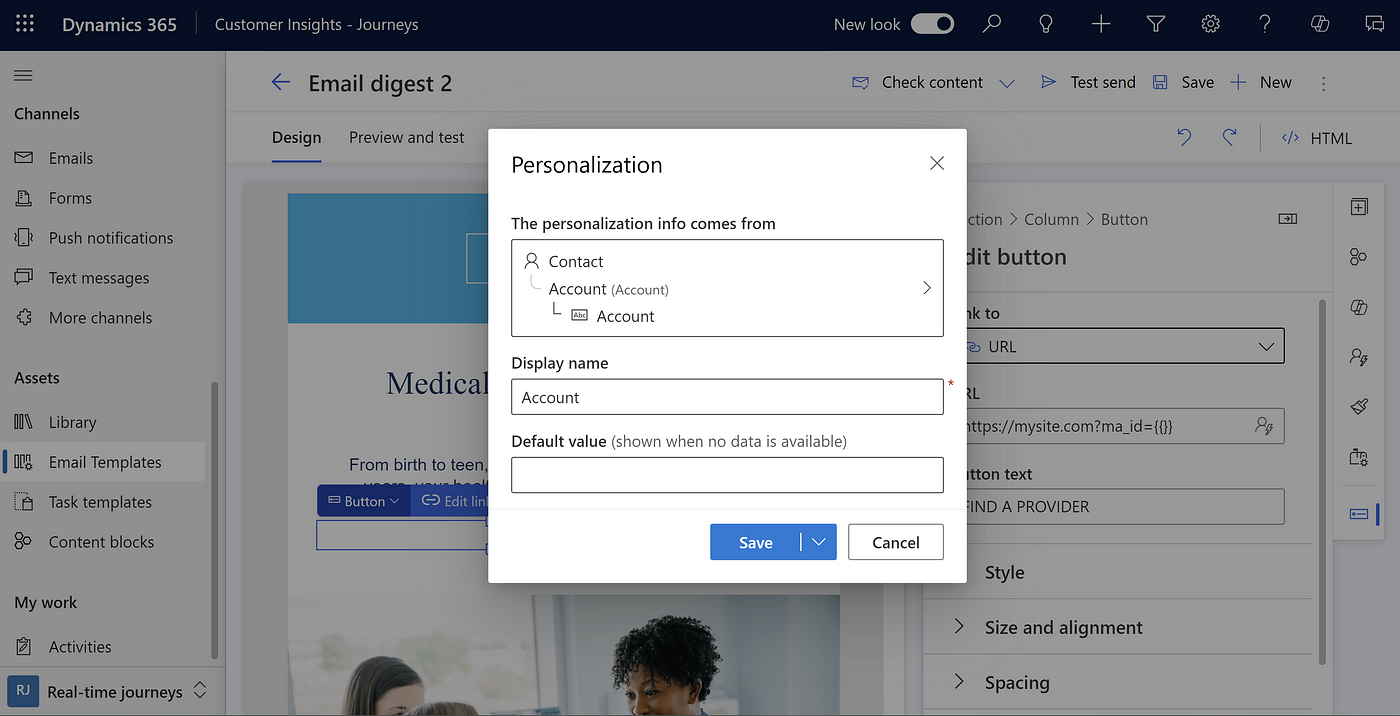
Select the relevant identifier field
After selecting the relevant field, you can see that the URL in my email template has populated the query string value with moustache template code.
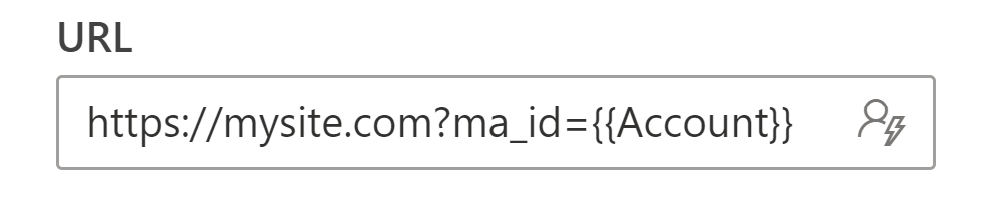
When the email is generated and sent to the user, the links will be updated to contain our new query parameter, along with the user’s unique identifier from Dynamics 365. e.g. https://mysite.com/?ma_id=1234
2.2) Capture the ID from the Query String
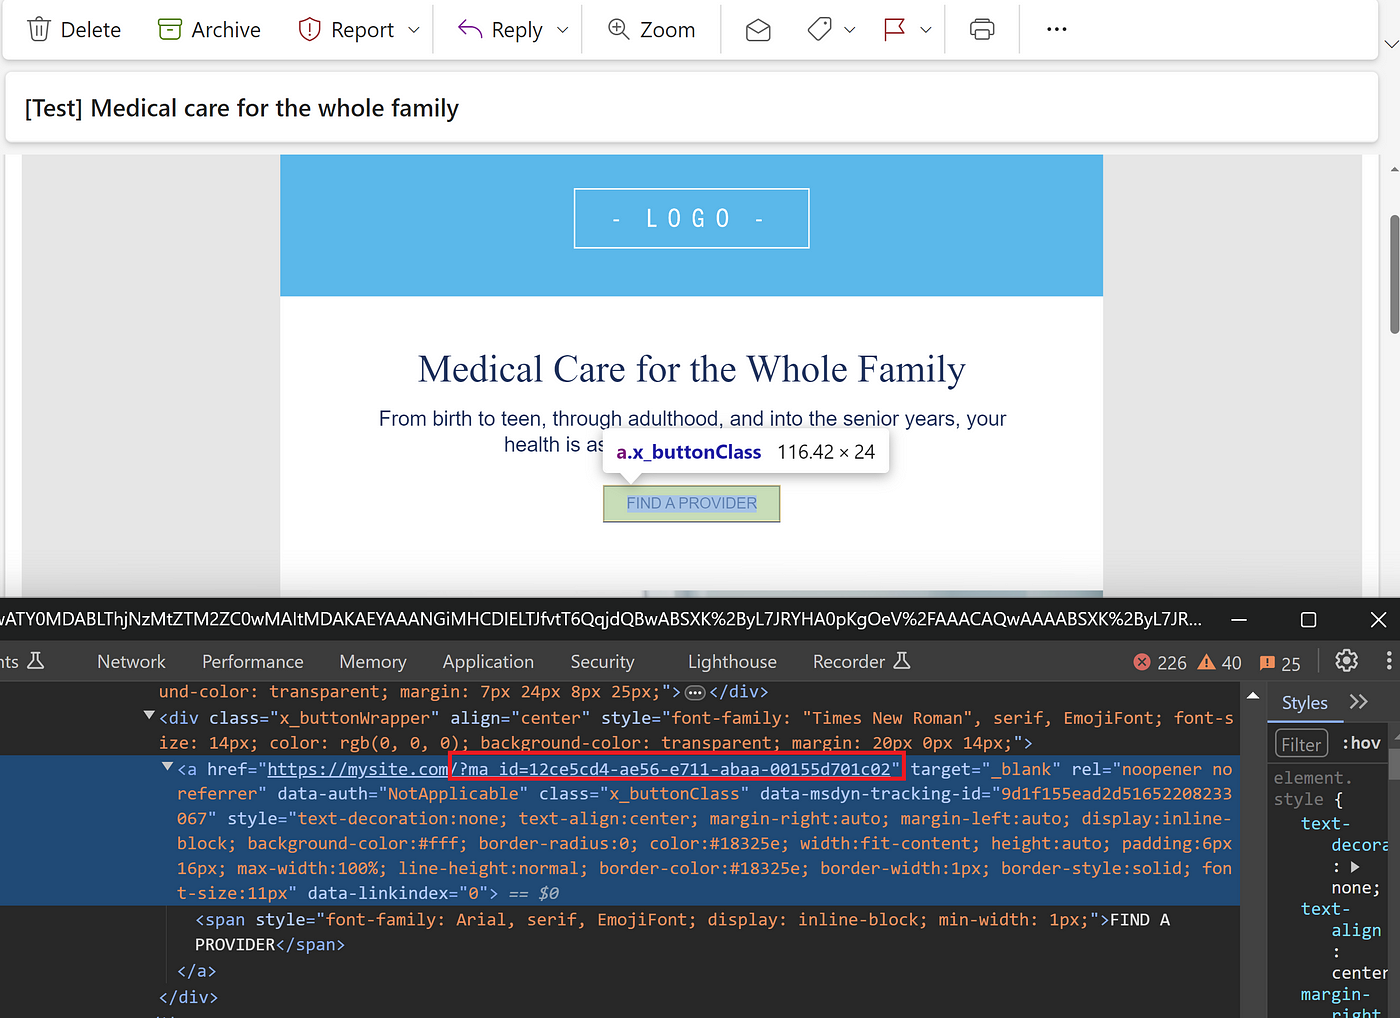
When the user clicks one of these links in their email, they are directed to our web application where we can capture their custom identifier from the URL.
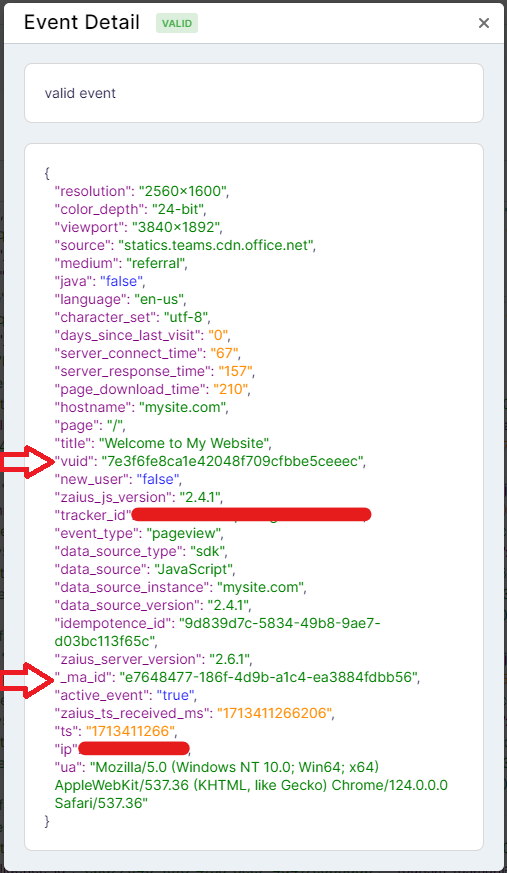
In the following code example, I have altered the default ODP tracking script in my web application to read the ‘ma_id’ from the browser’s current URL and pass this along to ODP when the page loads.
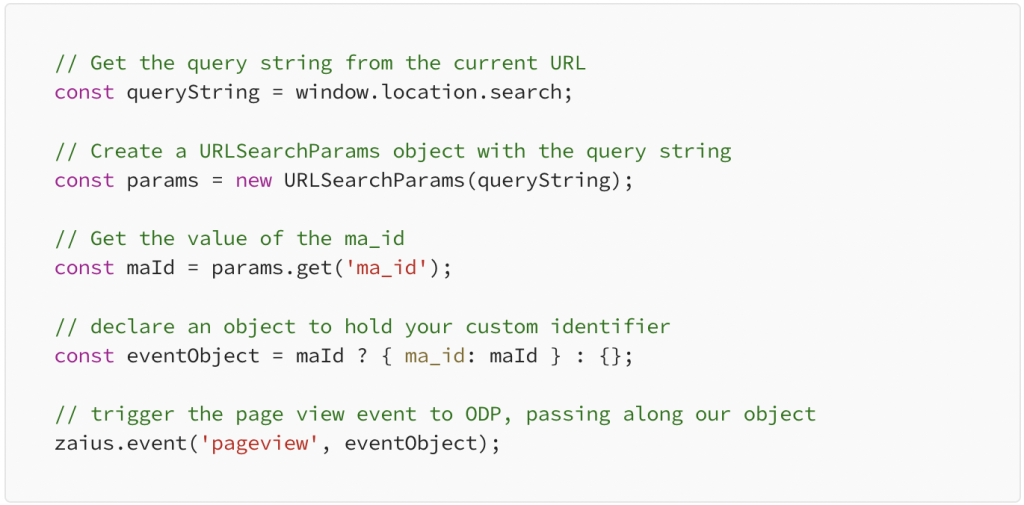
When this event fires, I can see in the ODP Event Viewer, that we have captured the user’s Marketing Automation ID (ma_id) from the query string together with the Visitor ID (VUID) from the user’s cookies.
ODP now has everything it needs to stitch customer records. If the same user, having first opened the link on their desktop, later clicks a personalised link on their mobile device, ODP will reconcile all interactions for the user across both devices.
That’s it.
A downside… email forwarding
A general pitfall in email tracking is email forwarding. When an email is forwarded, especially multiple times, it can distort the tracking data. This is true of all marketing automation platforms. In my example it also carries the risk of multiple users clicking links in the shared email and these users being stitched together under one customer record in ODP.
An upside… linking 3rd party data
Now that I have captured the Marketing Automation ID to some of my customer records I can use this to further enrich ODP data and deliver even more personalised experiences.
Let’s take my example of using Dynamics 365. Perhaps you run a travel company and your Dynamics instance records which users have travelled overseas in the last 12 months.
You could export a list of account IDs in this cohort and import them to a custom list in ODP. You could then create a segment (or real-time segment) of users that exists in the imported list and use this to drive personalisation in your website. For example, when these visitors land on your site, you could show them a custom banner, e.g. ‘Still thinking of that last overseas adventure?’.
Note, you can do this without needing to bring over any PII from your external systems, just a list of IDs.
Summing up
In this article, I’ve demonstrated how you can track users to ODP between sessions and across multiple devices without capturing or relying on any PII data.
I have given the example of using email templates in Microsoft Dynamics 365 but you could also do the same linking from any CRM or e-commerce or marketing automation platform. You could also pass an identifier from your mobile app to your website using links in the UI or via push notifications. Generally speaking, it should be possible wherever you have an external system that links users back to your website.
With all this set up, you will start to learn more about your visitors, you just need to get them to click your links. The more you entice your users to interact with the links you share with them the more customer records ODP will be able to stitch together. This will lead to more accurate data about your site visitors and will allow you to create more accurate reporting and better personalisation.
If you’d like to talk more about Optimizely and the ODP or need help with your implementation, contact me at Orchard through hello@orchard.com.au.